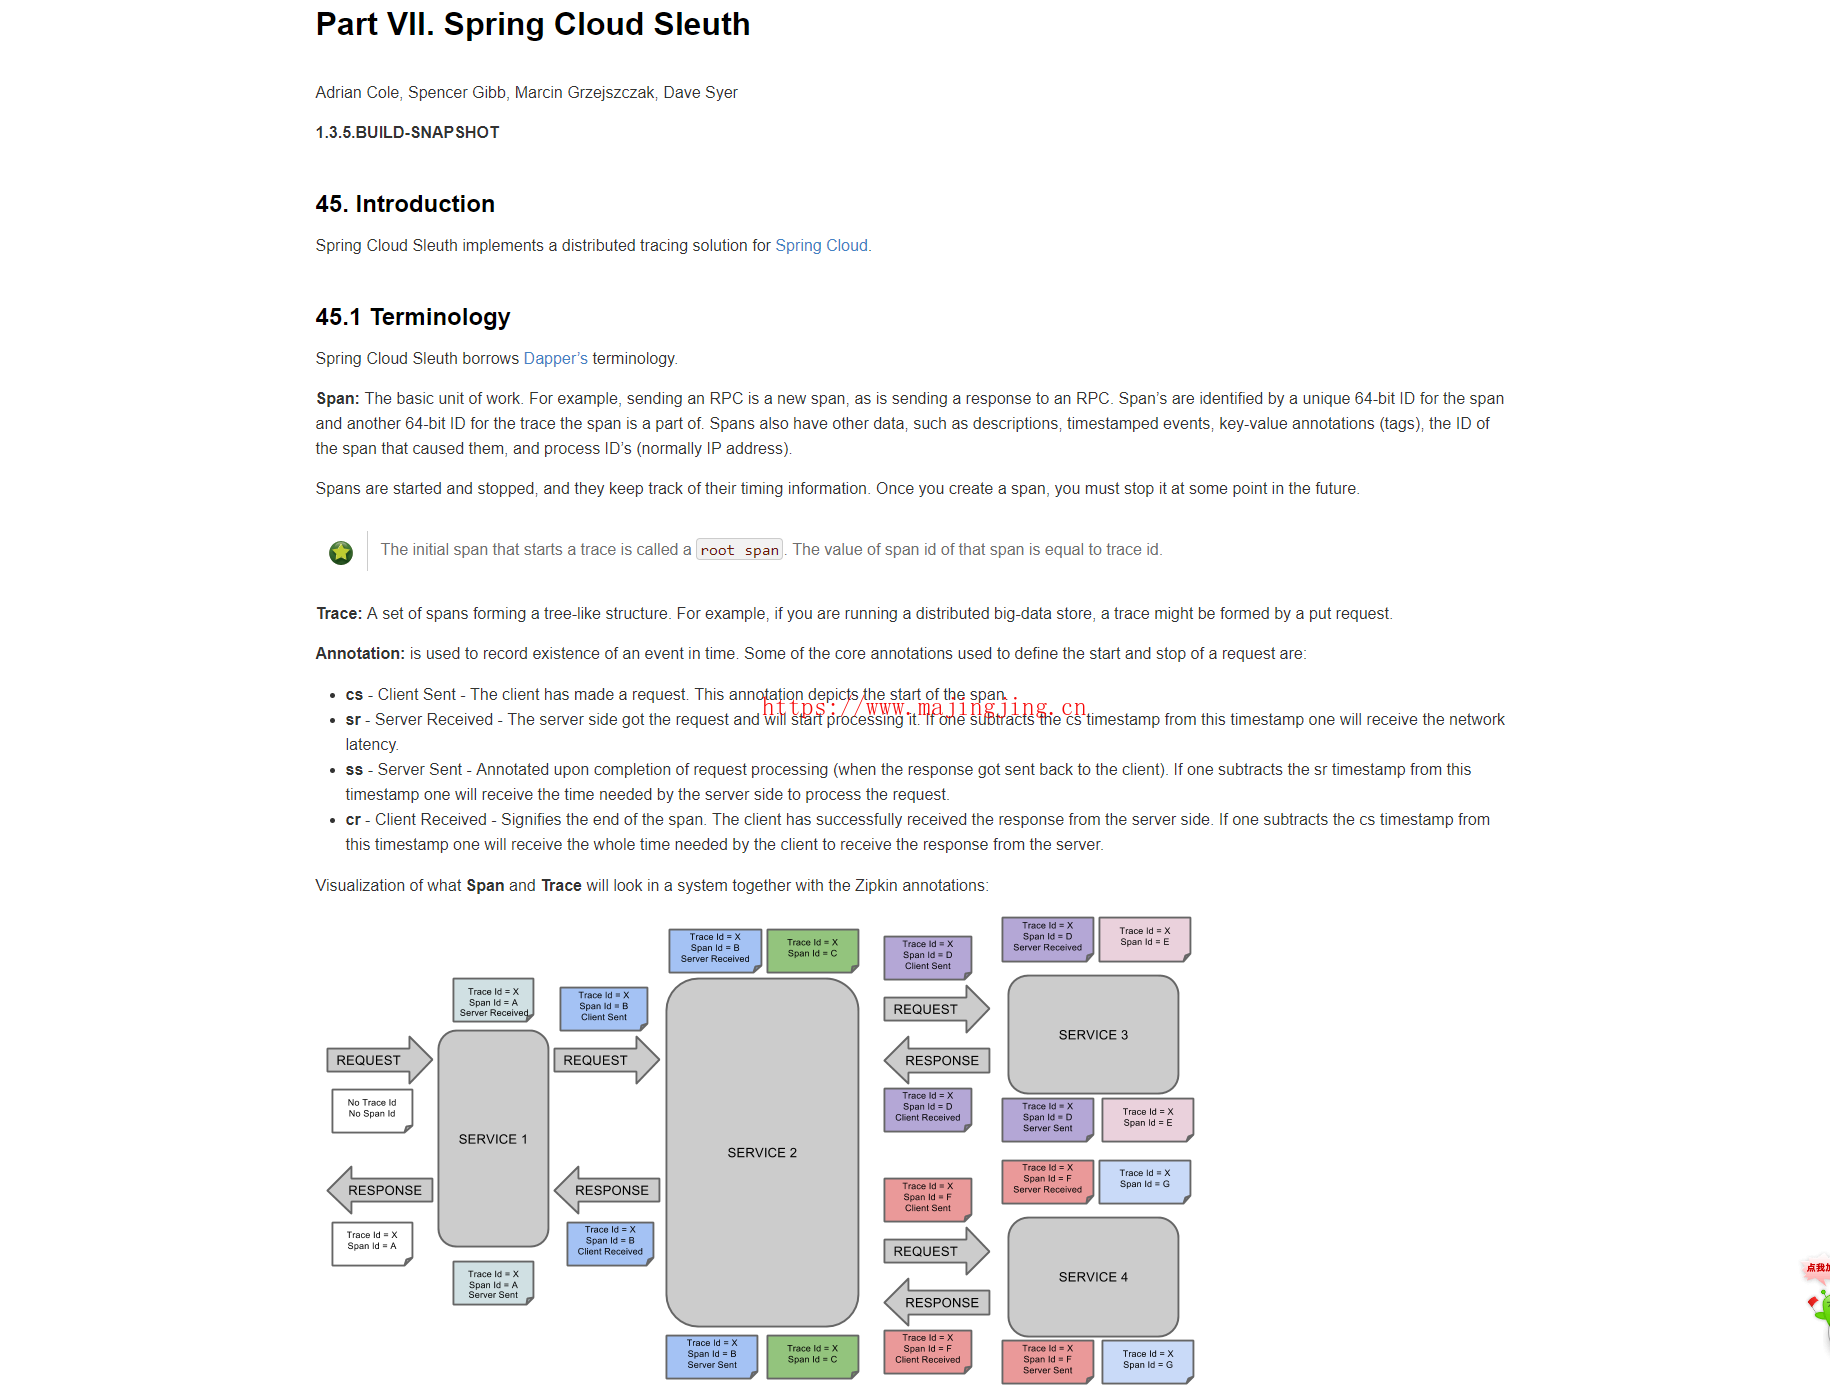
Spring Cloud Sleuth为Spring Cloud实现分布式跟踪解决方案。

Zipkin是Twitter的一个开源项目,是一个致力于收集Twitter所有服务的监控数据的分布式跟踪系统,它提供了收集数据,和查询数据两大接口服务。
Spring Cloud Sleuth集成了zipkin组件
类似dubbo中的服务提供者和消费者一样,当我们的rest微服务很多的时候,服务之间的调用关系就会非常复杂,对调用链的分析会越来越复杂。

下面开始简单学习下sleuth和zipkin的集成使用
ZipkinServer搭建
1.构建一个maven项目 tm-zipkin-server (一个Zipkin服务器,您的应用程序 在端口9411上承载UI和API)
2.在pom中加入zipkin的依赖支持

<dependency>
	<groupId>io.zipkin.java</groupId>
	<artifactId>zipkin-server</artifactId>
</dependency>
<dependency>
	<groupId>io.zipkin.java</groupId>
	<artifactId>zipkin-autoconfigure-ui</artifactId>
</dependency>
3.在application.yml中增加配置参数
server:
  port: 8769

spring:
  application:
    name: zipkin-server

eureka:
  client:
    serviceUrl:
      defaultZone: http://localhost:8761/eureka/
4.在主启动类上增加注解 @EnableZipkinServer
@SpringBootApplication
@EnableDiscoveryClient
@EnableZipkinServer
public class ZipkinServerApplication {

	public static void main(String[] args) {
		SpringApplication.run(ZipkinServerApplication.class, args);
	}

}
ZipkinClient搭建
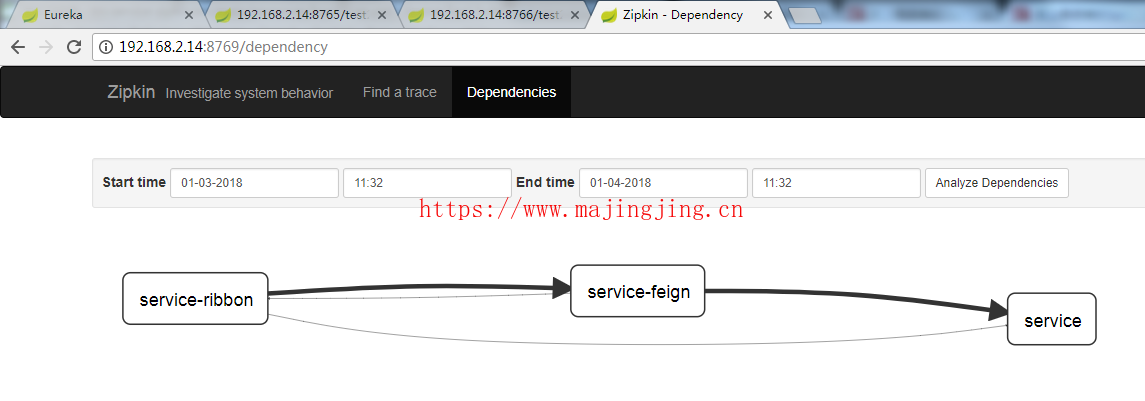
现在我们来构建几个微服务的调用关系,比如有三个微服务(tm-service,tm-service-feign,tm-service-ribbon),调用关系如下
从tm-service-feign发送请求
/test1
feign ---> ribbon --> service

/test2
feign ---> service
从tm-service-ribbon发送请求
/test1
ribbon --> service

/test2
ribbon ---> feign --> service
tm-service搭建
1.构建maven项目 tm-service
2.在pom中增加zipkin依赖支持
<dependency>
	<groupId>org.springframework.cloud</groupId>
	<artifactId>spring-cloud-starter-zipkin</artifactId>
</dependency>
3.在application.yml中增加 zipkin 的配置
server:
  port: 8762

spring:
  application:
    name: service
  zipkin:
    base-url: http://localhost:8769

eureka:
  client:
    serviceUrl:
      defaultZone: http://localhost:8761/eureka/
4.对外提供3个服务
@RestController
public class ServiceController {

	@Value("${server.port}")
	String port;

	@RequestMapping("/hello")
	public String hello(@RequestParam(name = "name", defaultValue = "皇太极") String name) {
		return String.format("service [hello]:%s , 欢迎使用[%s]的服务", name, port);
	}

	@RequestMapping("/test1")
	public String test1(@RequestParam(name = "name", defaultValue = "皇太极") String name) {
		return String.format("service [test1]:%s , 欢迎使用[%s]的服务", name, port);
	}

	@RequestMapping("/test2")
	public String test2(@RequestParam(name = "name", defaultValue = "皇太极") String name) {
		return String.format("service [test2]:%s , 欢迎使用[%s]的服务", name, port);
	}
}
tm-service-feign搭建
1.构建maven项目 tm-service-feign
2.在pom文件中增加zipkin的依赖支持
<dependency>
	<groupId>org.springframework.cloud</groupId>
	<artifactId>spring-cloud-starter-zipkin</artifactId>
</dependency>
3.在application.yml中增加zipkin的配置
eureka:
  client:
    serviceUrl:
      defaultZone: http://localhost:8761/eureka/
server:
  port: 8765
spring:
  application:
    name: service-feign
  zipkin:
    base-url: http://localhost:8769
4.创建一个调用 tm-service 的客户端
@FeignClient(value = "service")
public interface IHelloService {
	@RequestMapping(value = "/hello", method = RequestMethod.GET)
	String hello(@RequestParam(value = "name") String name);

	@RequestMapping("/test2")
	String test2(@RequestParam(name = "name", defaultValue = "皇太极") String name);
}
5.创建一个调用 tm-ribbon 的客户端
@FeignClient(value = "service-ribbon")
public interface IRibbonService {

	@RequestMapping("/test1")
	String test1(@RequestParam(name = "name", defaultValue = "皇太极") String name);
}
6.对外提供3个服务接口
@RestController
public class HelloController {

	@Autowired
	IHelloService helloService;

	@Autowired
	IRibbonService ribbonService;

	@RequestMapping(value = "/hello", method = RequestMethod.GET)
	public String hello(@RequestParam(name = "name", defaultValue = "皇太极") String name) {
		return "feign: " + helloService.hello(name);
	}

	@RequestMapping(value = "/test1", method = RequestMethod.GET)
	public String test1(@RequestParam(name = "name", defaultValue = "皇太极") String name) {
		return "feign ---> " + ribbonService.test1(name);
	}

	@RequestMapping(value = "/test2", method = RequestMethod.GET)
	public String test2(@RequestParam(name = "name", defaultValue = "皇太极") String name) {
		return "feign ---> " + helloService.test2(name);
	}

}
tm-service-ribbon构建
1.构建maven项目 tm-service-ribbon
2.在pom中引入 zipkin 依赖支持
<dependency>
	<groupId>org.springframework.cloud</groupId>
	<artifactId>spring-cloud-starter-zipkin</artifactId>
</dependency>
3.在application.yml中增加zipkin的配置
eureka:
  client:
    serviceUrl:
      defaultZone: http://localhost:8761/eureka/
server:
  port: 8766
spring:
  application:
    name: service-ribbon
  zipkin:
    base-url: http://localhost:8769
4.对外提供3个服务接口,分别调用到 tm-service , tm-service-feign 服务
@RestController
public class HelloController {

	@Autowired
	RestTemplate restTemplate;

	@RequestMapping(value = "/hello", method = RequestMethod.GET)
	public String hello(@RequestParam(name = "name", defaultValue = "皇太极") String name) {
		return "ribbon ---> " + restTemplate.getForObject("http://SERVICE/hello?name=" + name, String.class);
	}

	@RequestMapping("/test1")
	public String test1(@RequestParam(name = "name", defaultValue = "皇太极") String name) {
		return "ribbon ---> " + restTemplate.getForObject("http://SERVICE/test1?name=" + name, String.class);
	}

	@RequestMapping("/test2")
	public String test2(@RequestParam(name = "name", defaultValue = "皇太极") String name) {
		return "ribbon ---> " + restTemplate.getForObject("http://SERVICE-FEIGN/test2?name=" + name, String.class);
	}

}
环境搭建完成,下面来看下实际效果。
演示效果
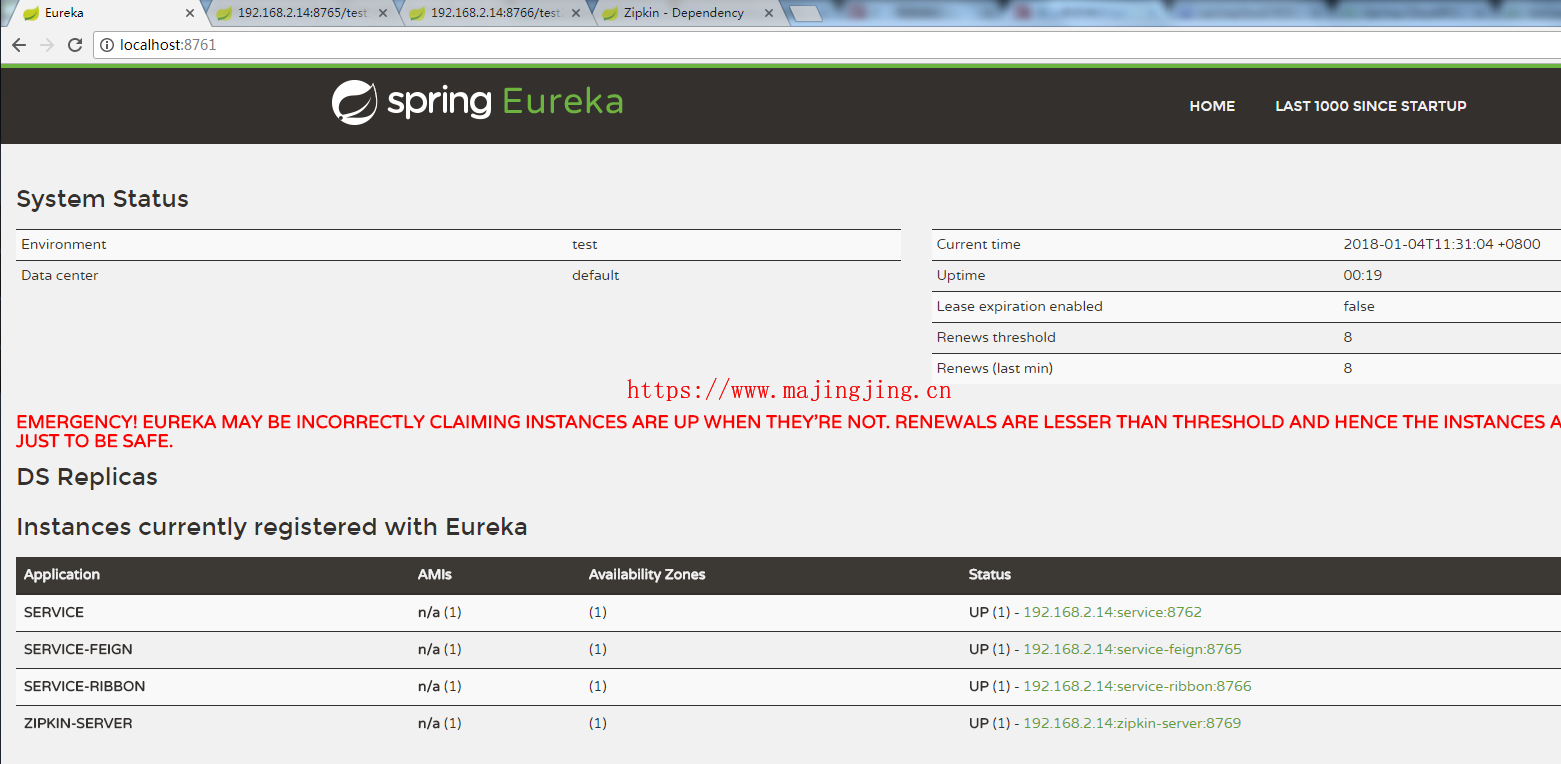
1.分别启动项目(tm-eureka-server,tm-service,tm-service-feign,tm-service-ribbon,tm-zipkin-server)
2.浏览器访问 http://localhost:8761/

http://192.168.2.14:8765/test1

http://192.168.2.14:8765/test2

http://192.168.2.14:8766/test1

http://192.168.2.14:8766/test2

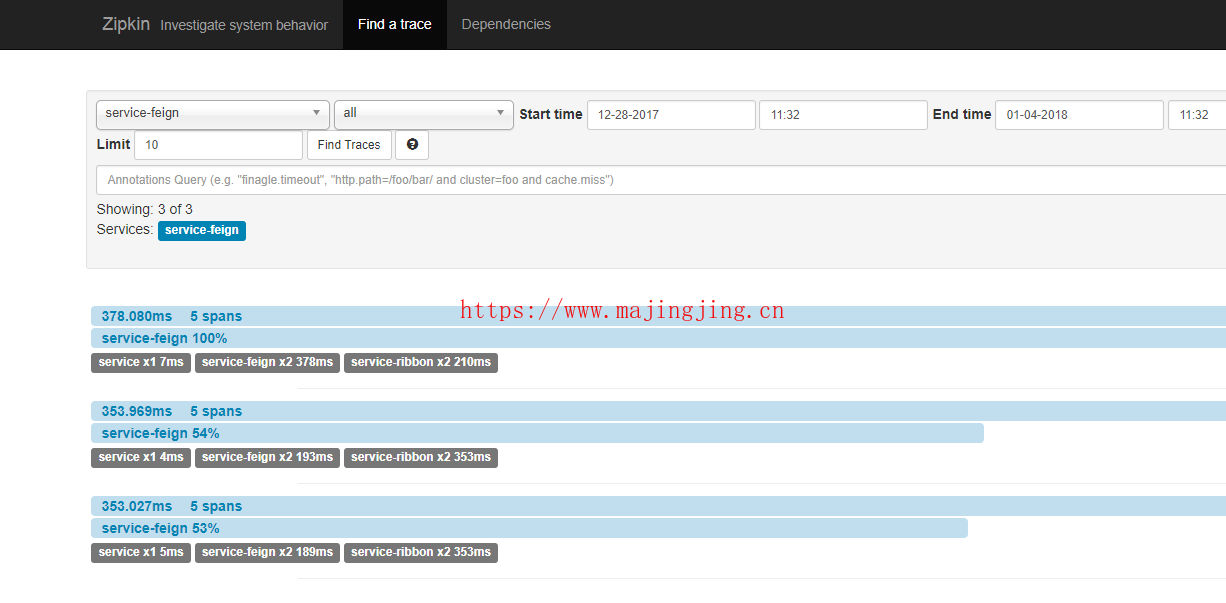
http://192.168.2.14:8769/


通过zipkin的控制台页面我们可以非常方便的看到每个微服务的调用依赖关系,和请求调用的消耗时间,以及调用参数等其他相关的信息。使得微服务的调用链关系非常清晰。
 打赏下吧
打赏下吧

